Learn How to Write with a Brush Pen
Book 4: Free Hand
Wang Ronghua
Opening Remarks
I presume all of you have gone through Book 1, which is a general introduction to Chinese calligraphy;
I presume all of you have a fundamental grasp of the Chinese language;
I presume all of you have gone through Book 2 and 3 and have an impulse to learn free hand.
I also presume you are all determined to master the skills;
I also presume you are all mentally prepared to devote a lot of time for practice.
If all my assumptions are right, you will finish this book with a firm grasp of skills of writing Free Hand.
One Word or Two about the Model
The model we are going to use is 《怀仁集王羲之书圣教序》, which means 《Prelude to the Sacred Religion Written by Wang Xizhi’s Calligraphy Collected by Huai Ren》.
The sacred religion was meant to be Buddhist sutra brought back by Monk Xuan Zang from India in 645, and the prelude was written by Emperor Taizong in 648. Monk Huai Ren was tasked to look for Wang Xizhi’s way of writing, of the words used by the emperor, from the imperial collection and collections by the common folks. It is said that it took Huai Ren 20 years to complete the job.
Huai Ren then imitated Wang’s writing. It was then carved onto a stone stele. There have been three versions of rubbings of this stele.
Three Key Links in Writing a Stroke
The 3 links are: 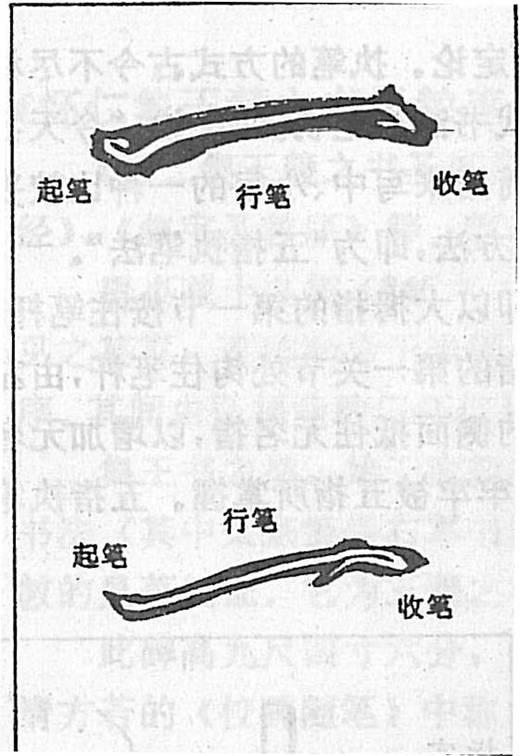
1. Starting the stroke (起笔in Chinese that reads qǐ bǐ);
2. Executing the stroke (行笔in Chinese that reads xīng bǐ);
3. Finishing the stroke (收笔in Chinese that reads shōu bǐ).
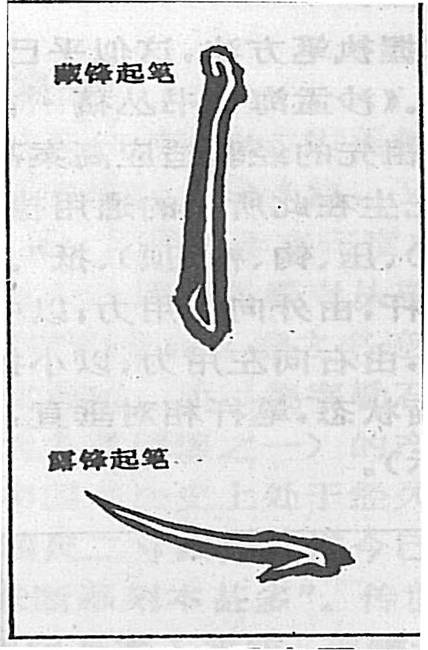
There are two ways to start a stroke: starting with tip-in as the upper stroke; starting with tip-out as the lower stroke.
There are 4 ways to finish a stroke: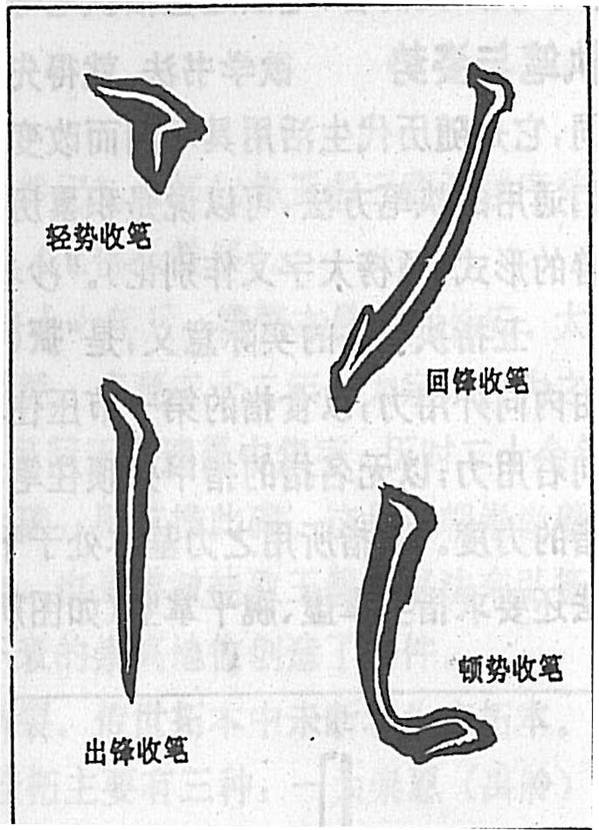
To finish off light as the stroke on upper left;
To finish with tip-in as the stroke on upper right;
To finish with tip-out as the stroke on lower left;
To finish off with a press down as the stroke on the lower right.
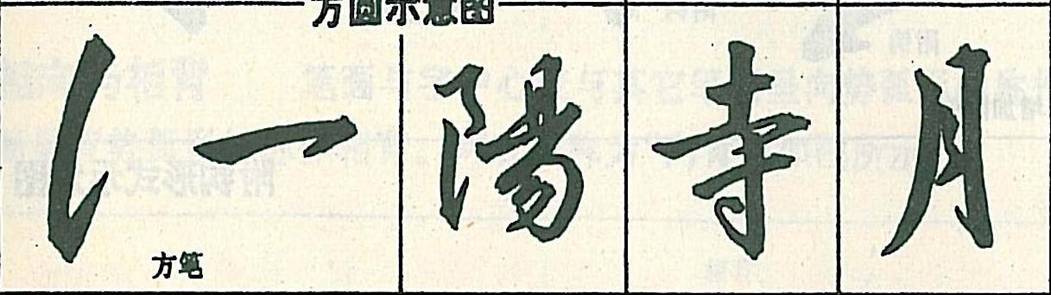
Sharp & Round Bend
Round bends as shown below:
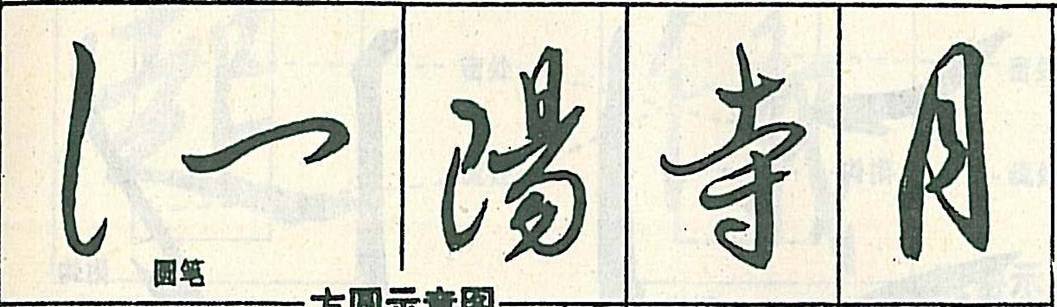
Sharp (or square) bends as shown below:
Kinds of Strokes
In general strokes are divided into 8 kinds:
1. dot;
2. horizontal stroke;
3. vertical stroke;
4. hook;
5. left stretching stroke;
6. right stretching stroke;
7. an elbow;
8. an up-ward stroke.
Structure of a Character
Structure of a character refers to the way strokes are composed to form a character.
Free hand should strike for motion on basis of evenness and uprightness.
Characters are divided into those with radicals and those without.
Those with radicals break into 6 categories, namely: (1) left and right; (2) upper and lower; (3) left, middle and right; (4) upper, middle and lower; (5) wholly enclosed; (6) semi-enclosed.
Placing of White Space and Density of Strokes
Placing white space refers to the comparison between black strokes and the white space left and the white space between characters and lines. Leaving a proper white space on the paper gives a holistic beauty;
Attention should also be paid to the density of strokes, and come to know where strokes should be kept apart or closer.
Inter-relations among Strokes and Charm
Inter-relations among strokes refer to the final posture of the composition of strokes, that would include placing of white space, directions strokes face, open or closed parts and etc.
Charm is usually produced by a combination of the calligrapher’s concept and his skills; such a combination can also projects the state of mind of the calligrapher.
Imitation and Copying
All calligraphers, almost with no exception, started their learning from imitating or copying widely recognized rubbings from stone inscriptions and model calligraphy on paper.
To imitate is to try to write the strokes and follow the structure of the rubbing that is placed before you as closely as possible.
To copy is to write, on a rather transparent paper over a model, as closely as the characters on the model.
You got to read the rubbings or models first before imitation, and study how the strokes are written and what the structure is.
When you imitate for the first time you should get the strokes right;
When you imitate for the second time you should get the structure right;
When you imitate for the third time you should get as closely as possible to the sample;
When you imitate for the fourth time you should ensure the strokes and structure look full and beautiful;
When you imitate for the fifth time you should instill liveliness into your writing.
Sometimes you may have to enlarge or minimize the rubbings or models in order to imitate properly;
Some people imitate the entire rubbing or model;
Some people memorize the whole rubbing or model and imitate without looking at them.
Some people imitate in their minds without actually writing down on paper.
There are three ways of copying:
One is to fill in the ink onto the double contour lines of a character;
One is to copy from the sample underneath your paper;
The other is to cover the red color strokes with black ink.
How to Write Dots
A straight dot: starting with tip-in, press to the right lightly and move down, finish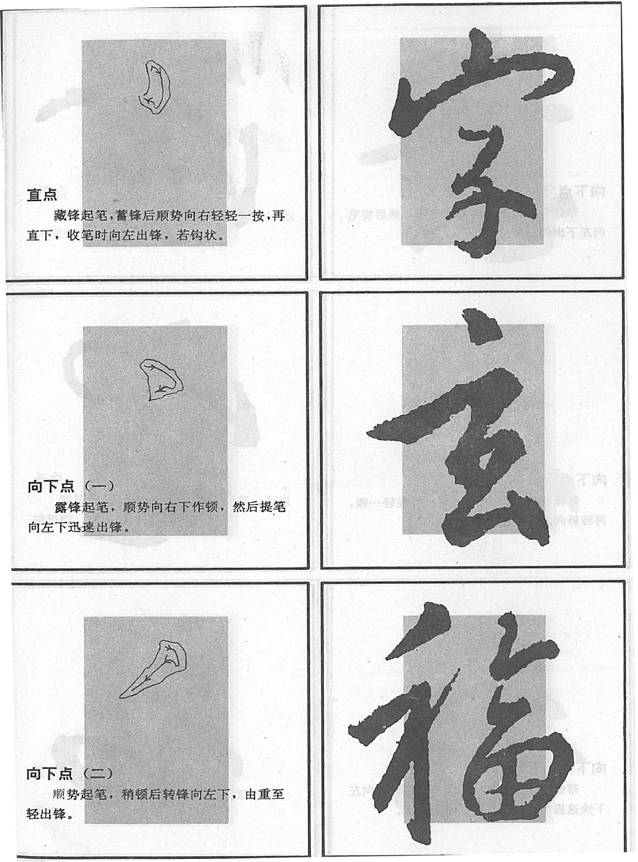 with tip-out to the left like a hook.
A down pointing dot (1): starting with tip-out, press down to lower right and then raise up and finish off quickly to lower left with tip-out.
A down pointing dot (2): starting with tip-out, pause, turn the tip and move to lower left, decrease weight gradually and finish off.
A down pointing dot (3): starting with tip-out, press down lightly to the lower 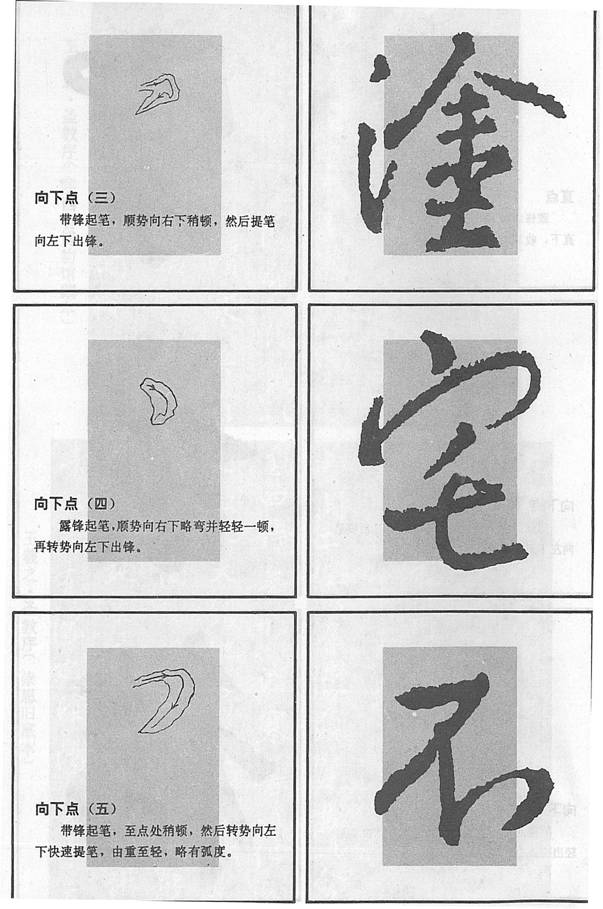 right, and then raise up and finish off to lower left.
A down pointing dot (4): starting with tip-out, move to lower right and press down lightly, turn the tip and finish off to lower left.
A down pointing dot (5): starting with tip-out, pause at the turn, decrease weight gradually and move to lower left with a curve.
A level dot: starting with tip-out and press down, pause and then move to the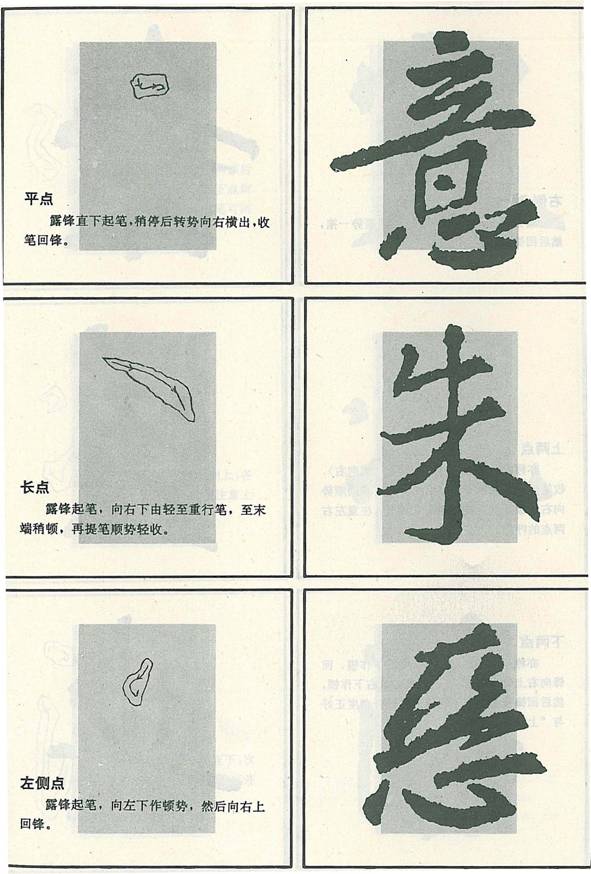 right, finish with tip-in.
A long dot: starting with tip-out, increase weight gradually while moving to lower right, pause, then raise up and finish.
A dot on the left side: starting with tip-out, press down to lower left, and then move the tip to upper right.
A dot on the right side: starting with tip-out, press down to lower right,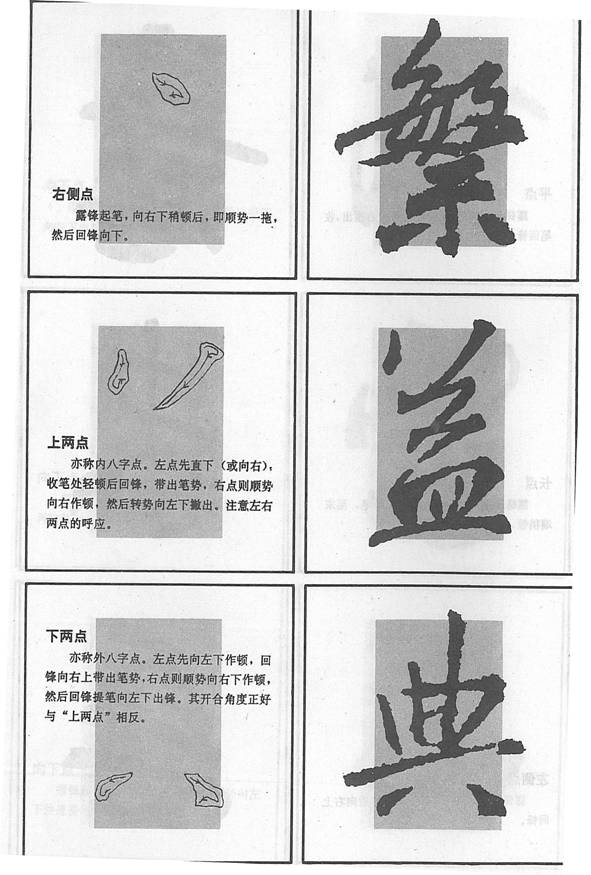 move to the left a bit and finish off with tip-out.
Two upper dots: starting the left one with tip-out and move straight down, pause and finish off to the right; starting the right one with a press to the right, turn the tip and move to lower left. The two should speak to each other.
Two lower dots: the left one press down to lower left, turn the tip and finish off to the right; starting the right one with a press to lower right, turn the tip and finish off to the left.
Two connecting dots: starting the upper one with tip-out, pause and move to 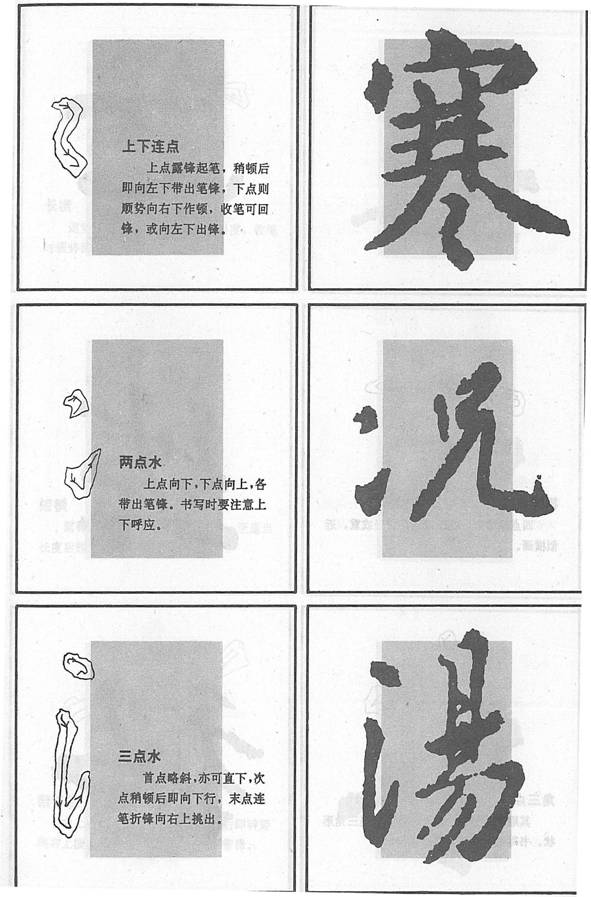 lower left, then press down to lower right, finish with tip-in.
Two dots: upper dot pointing down while lower dot pointing up, all finish with tip-out, the two should correspond to each other.
Three dots: the upper dot is slightly slanting, or could be straight down, when starting the middle dot, pause first and then move down, turn the tip at the low end and finish off to upper right.
Left and right connecting dots: one higher, one lower, in a slanting position.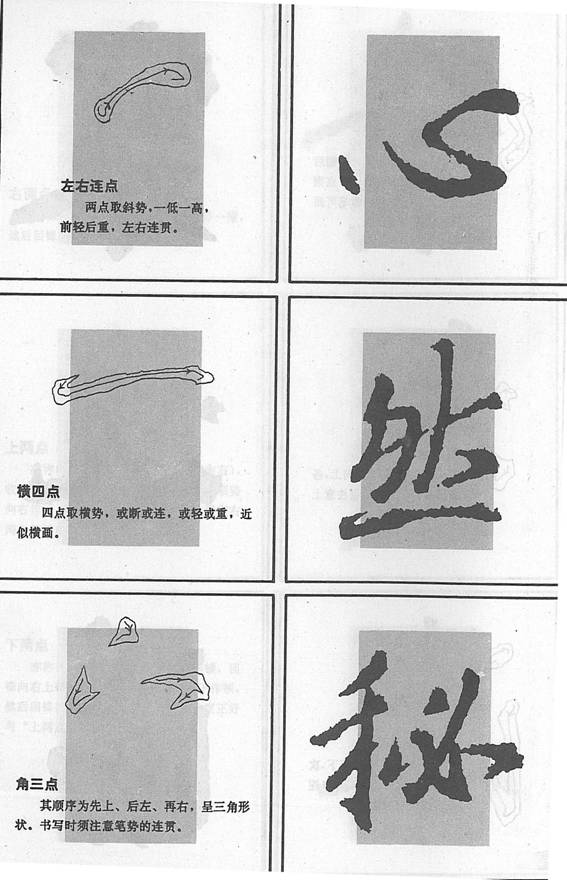
Four horizontal dots: the four dots are in a row, connected or otherwise, almost like a horizontal.
Three dots in a triangle: write the upper one first, then the left one and the right one at the end.
How to Write Horizontals
Long horizontal: starting with tip-in, move to the right, slightly upward, pause at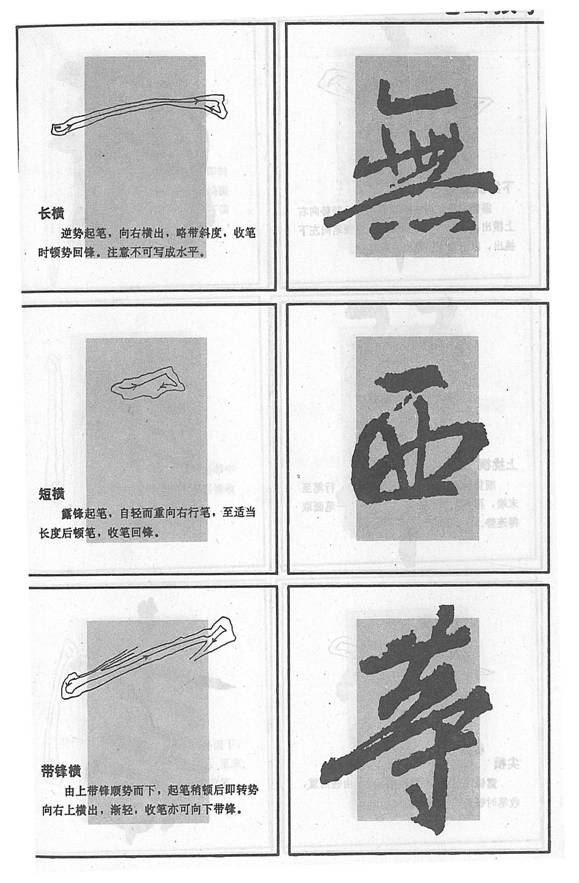 the end and finish with tip-out. Never should it be written even or leveled.
Short horizontal: starting with tip-out, move to the right and increase weight, then press down and finish with tip-in.
A horizontal with a connection from the last stroke: continuing the last stroke, pause, then move to upper right with reduced weight, can finish the stroke with tip-out.
A bending down horizontal: starting with tip-out, press down hard to lower right,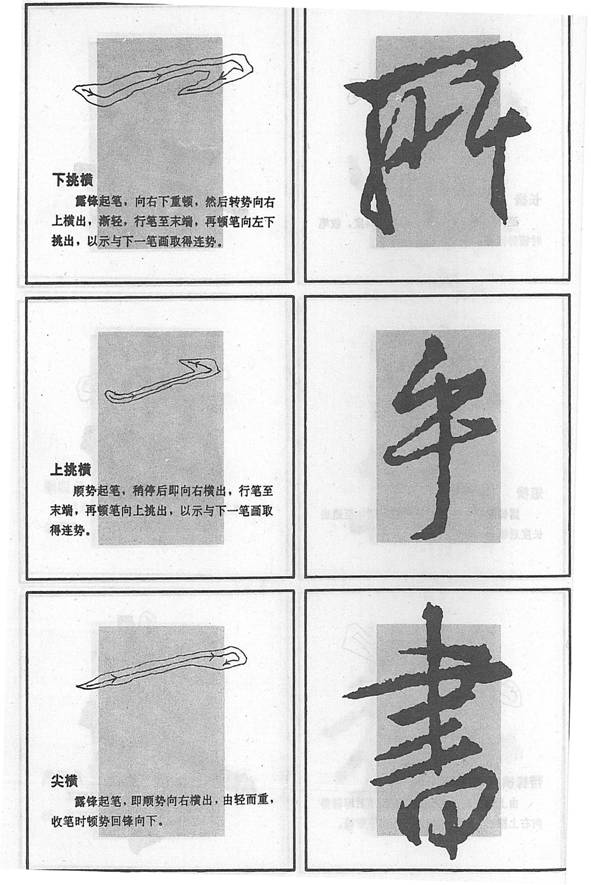 then move to the right, pause and finish off towards lower left.
A bending up horizontal: starting with tip-out, pause and move to the right, press and finish off upwards.
A pointing horizontal: starting with tip-out, move to the right with increased weight and finish off down-ward.
How to Write Verticals
A hanging needle: starting with tip-in, pause and move down with the middle part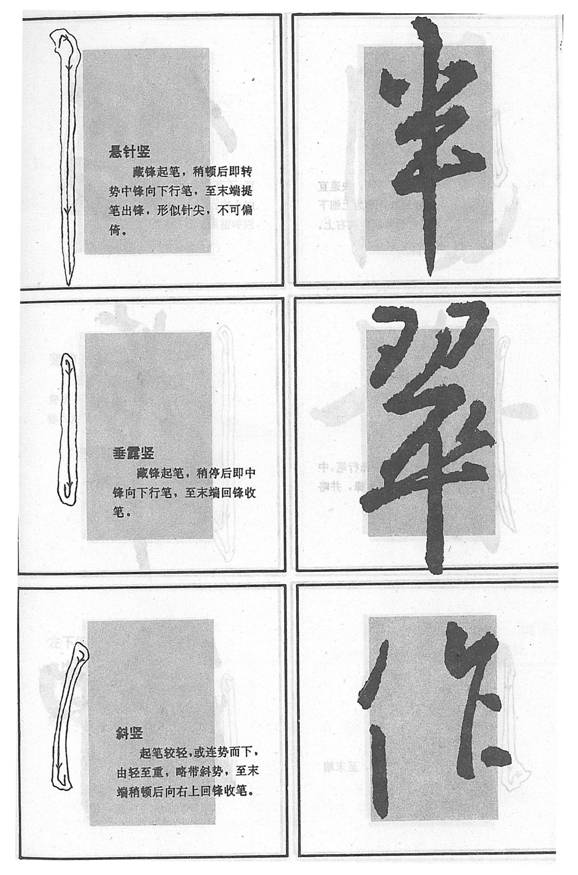 of the brush, raise at the lower end and finish with tip-out.
A pendent dew: starting with tip-in, pause and move down with the middle part of the brush, and finish at the lower end with tip-in.
A slanting vertical: starting with tip-out lightly, move down with increased weight, slightly slanting, pause at the lower end finish with tip-in towards upper right.
A drooping vertical: starting lightly with tip-out, move down quickly with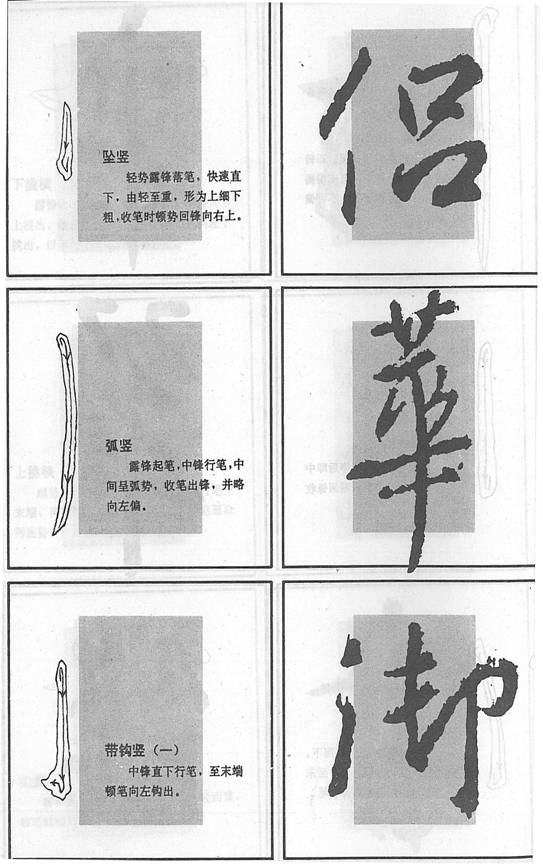 increased weight, press down at the low end and finish off towards upper right.
A curving vertical: starting with tip-out, move down with the middle part of the brush and bend in the middle of the stroke and finish with tip-out to the left.
A vertical with a hook (1): move down with the middle part of the brush, pause and finish off to the left.
How to Write Hooks
A vertical with a hook (2): starting with tip-in and pause, then bend down and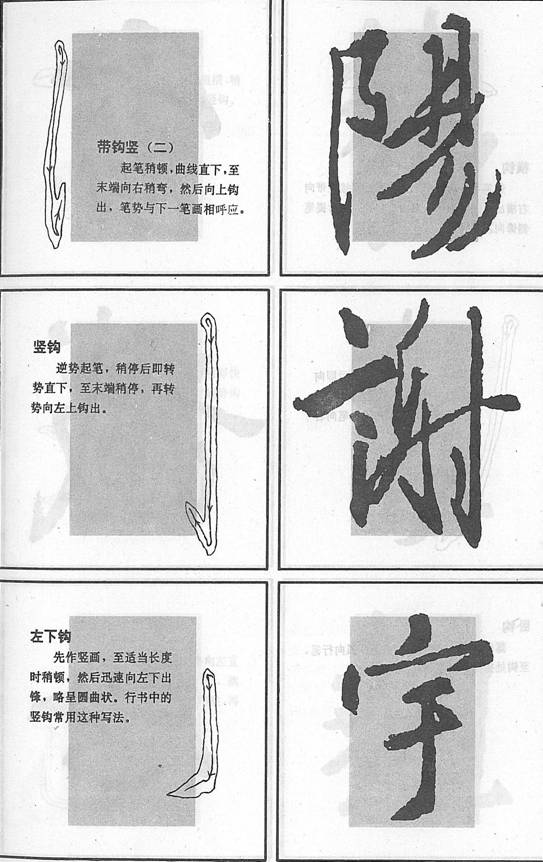 move slightly to the right at the low end and finish off to upper right.
An vertical hook: starting with tip-in, pause and move right down and finish off to upper left.
A left pointing hook: starting as a vertical and finish off to the lower left. It is quite common in free hand as a form of vertical.
A horizontal hook: starting connects with the last stroke, move to the right with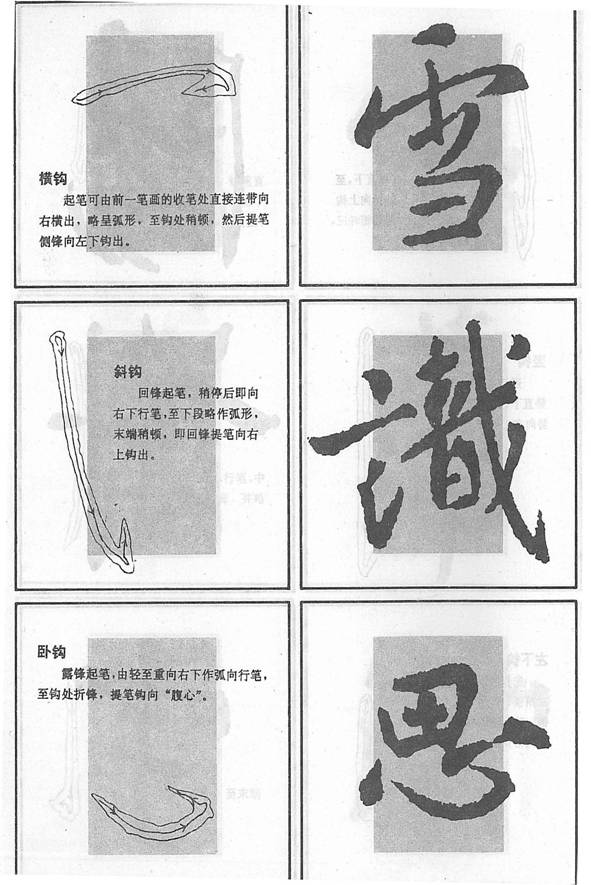 a slight arch, press down at the right end, raise and finish off to the lower left.
A slanting hook: starting with tip-in, pause and move to lower right with a slight curve, pause at the low end and finish off to the upper right.
A sleeping hook: starting with tip-out, move to lower right with increased weight, then bend upward and finish off to the upper left.
A vertical hook with a longer upper arm: starting with tip-out, move to the right 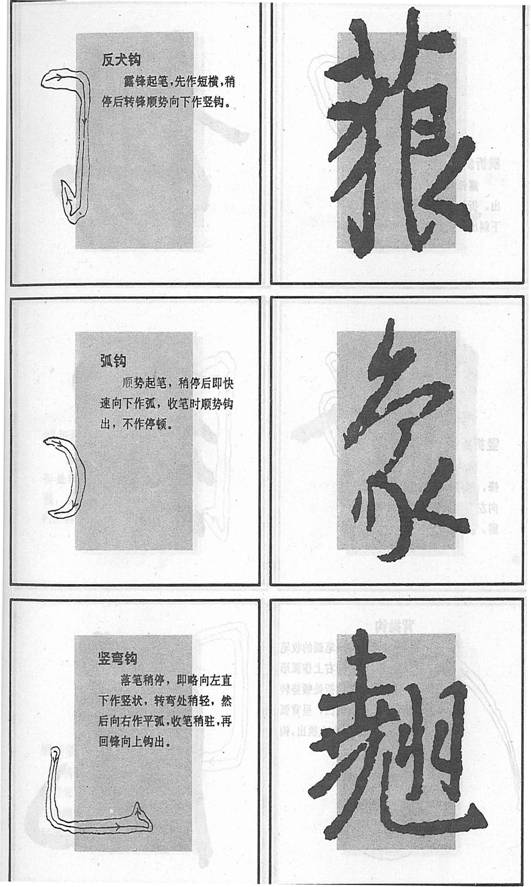 and pause, then move down as a vertical hook.
An arc like hook: starting with tip-out, move down as an arc and finish with tip-out.
A left elbow: pause at the start, then move down slightly to the left, bend and move to the right, pause at the end and tip up.
A slanting hook: starting with tip-out, move slightly to lower right, pause and 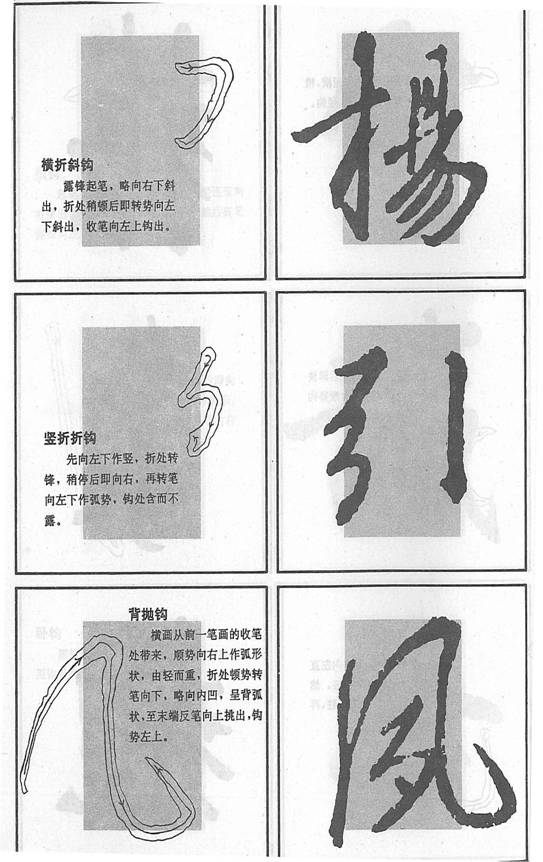 move to lower left, and finish off towards upper left.
A vertical and a hook: the vertical moves towards lower left, twist the tip at the bend, pause, move on to the right, twist the tip again to lower left with a slight curve, finish off with an unexposed tip-out.
A right hook with a handle: the handle starts from the last stroke, moves to upper right with a slight curve and increased weight and turn at the bend and move down with a slight dent to the left, and tips off at the end to upper left.
A curving hook: start light with a tip-out, move to lower right with increased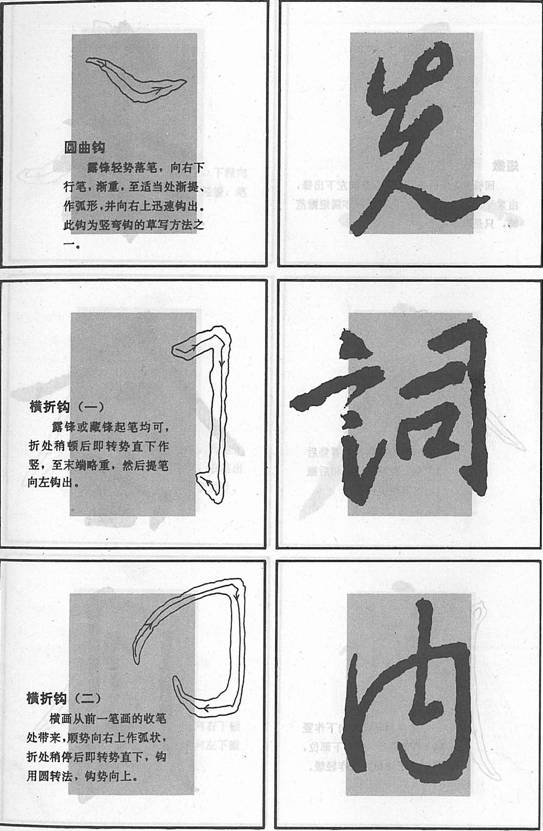 weight, then raise up slowly as a curve and finish off to the upper right.
A hook with a horizontal arm (1): starting with tip-out, pause at the turn and move down straight, give more weight at the low end, then raise and finish off to the left.
A hook with a horizontal arm (2): the horizontal continues from the last stroke, move to upper right with a slight arc, pause at the turn and move straight down, tip upwards at the finish.
How to Write Left Stretching Stroke
A short left stretching stroke: start with a press down and tip-in, move quickly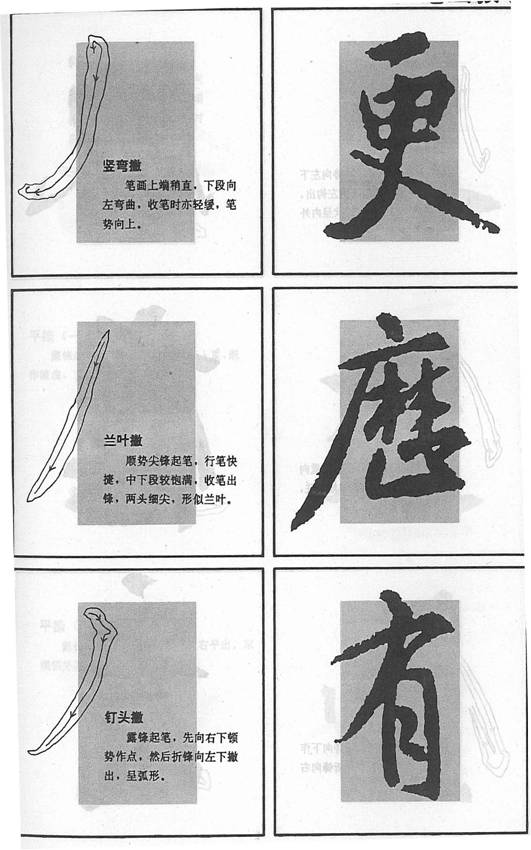 to lower left with increased weight.
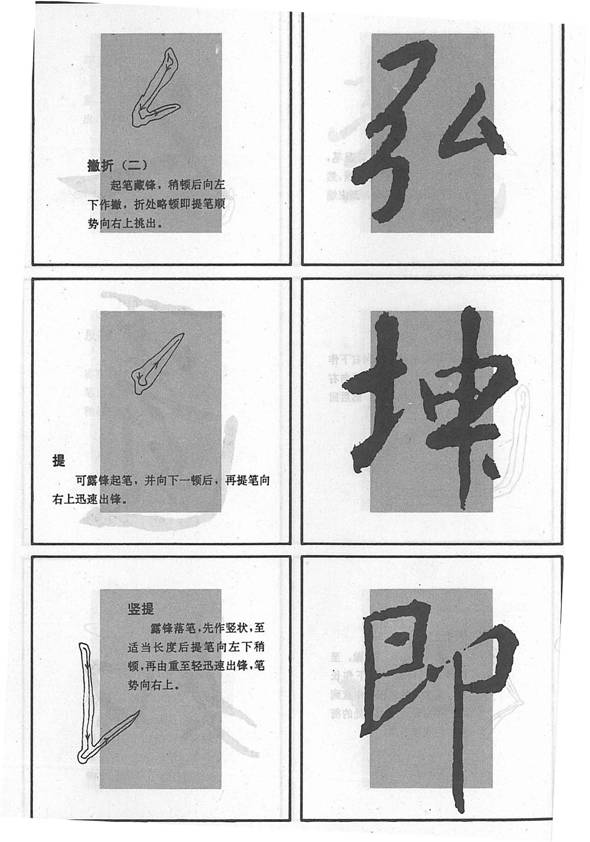
A slanting left stretching stroke: start with a pause and tip-in, then move to lower left and raise up the brush gradually and finish with a pointing.
An almost straight left stretching stroke: start with tip-in, move down with a slight bend and stretch to the left from the middle and finish off slowly.
A long left stretching stroke: the upper part is straight, the lower part bends to the left, finish off slowly and tips up.
An orchid leaf: starting with tip-out, move fast, the middle part is fleshy and finish with tip-out.
A left stretching stroke with a nail head: starting with tip-out, press down to lower right, then twist the tip and move to lower left with a curve and tip-out.
A left stretching stroke with a hook: start light and move to lower left and tip up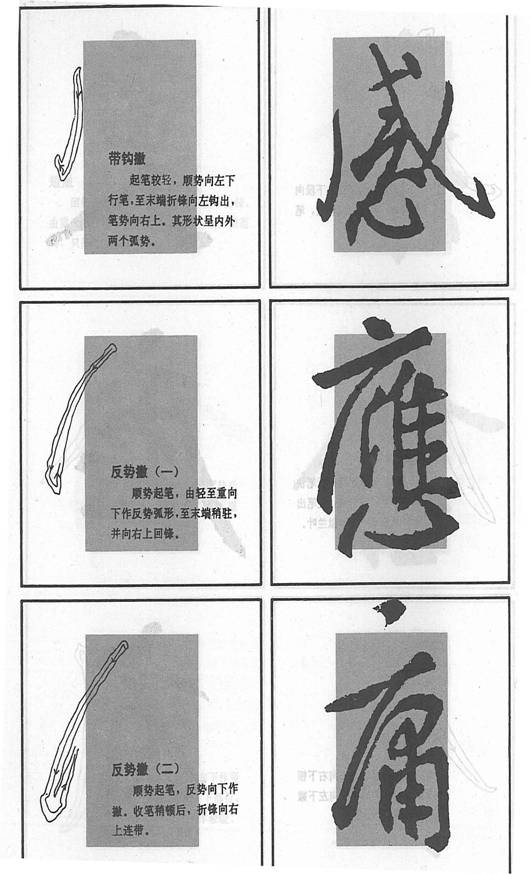 to the left at the end.
A left bow (1): start with tip-out, move down like a bow with increased weight, pause at the low end and finish with tip-in.
A left bow (2): start with tip-out, move down like a bow, pause at the low end and tip off to upper right.
How to Write Right Stretching Stroke
A slanting right stretching stroke: start with tip-out, move to lower right with  increased weight, pause at the right end and finish with tip-out.
A flat right stretching stroke (1); start with tip-in, move to the right with increased weight and a curve, pause at the right end and finish with tip-out.
A flat right stretching stroke (2): start with tip-out and pause, then move in a level way to the right, press slightly at the right end and finish with tip-in.
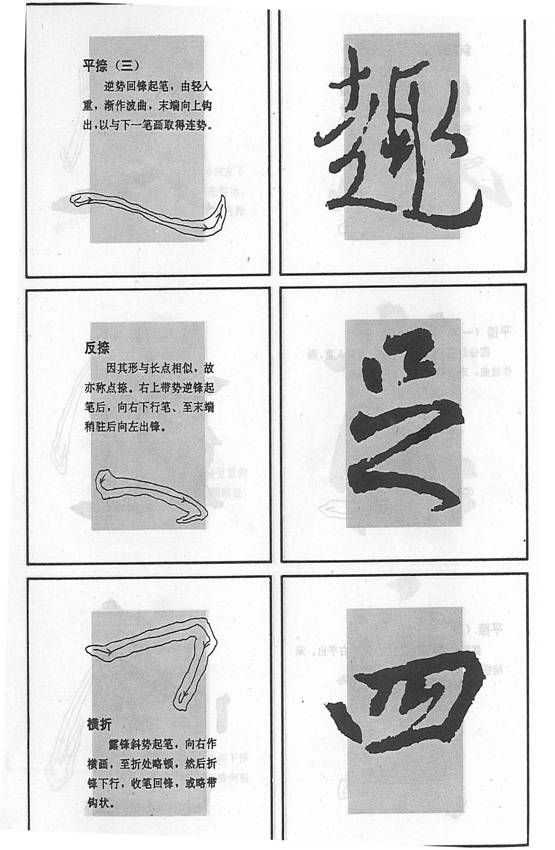 A flat right stretching stroke (3): starting with tip-in, make a curve with increased weight and tip up at the right end.
A right bow: the start is carried over from the last stroke, move to lower right, pause at the right end and tip off to the left.
An upside down elbow: start with tip-out, move to the right, pause at the bend, and then move down and finish with tip-in.
Writing of Elbows
A left stretching stroke with a lid: the lid comes from the last stroke, pause 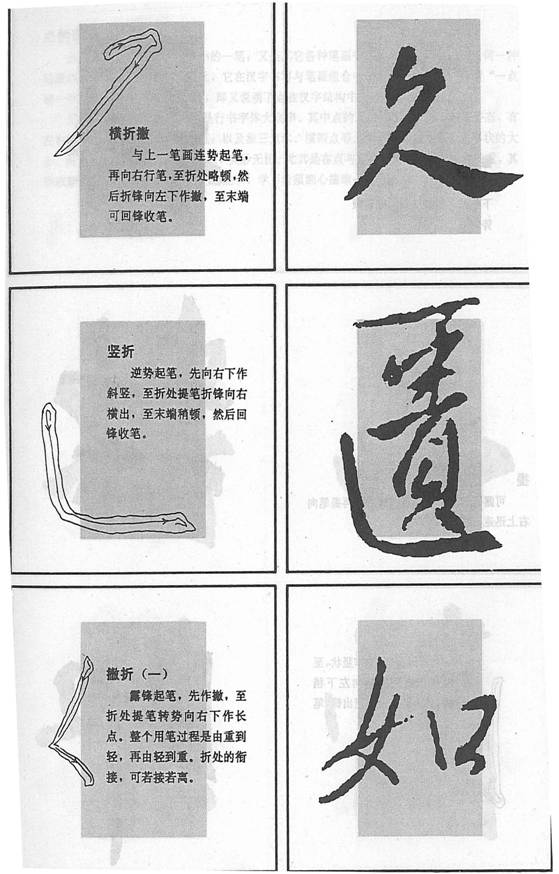 after moving to the right, twist the tip and move to lower left and finish with tip-out.
An elbow: start with tip-in, move down to slightly to the right, twist the tip at the bend and move to the right, pause at the right end and finish with tip-in.
A standing elbow (1): start with tip-out, stretch to the left, then raise up the brush and move to lower right with increased weight.
Writing of Elbow and a Raise
 A standing elbow (2): start with tip-in, press down and then move to lower left, pause at the bend, raise up and finish off to upper right.
A raise: start with tip-out, press down, raise up and finish off quickly to upper right.
A vertical and a raise: start with tip-out, move downward, press to the left and move to upper right quickly while reducing the weight.
More on Dots
Being the smallest stroke, a dot is the basic for all other strokes, which are extensions of a dot.
Learners should carefully study the dots written by Wang Xizhi, which vary so much.
More on Horizontals
A horizontal is a beam in the structure, that balances the entire body.
A horizontal may change in length, in its position as whether it is level or slanting, straight or curves a little. Its start or end can also make a difference. Some times a dot serves as a horizontal.
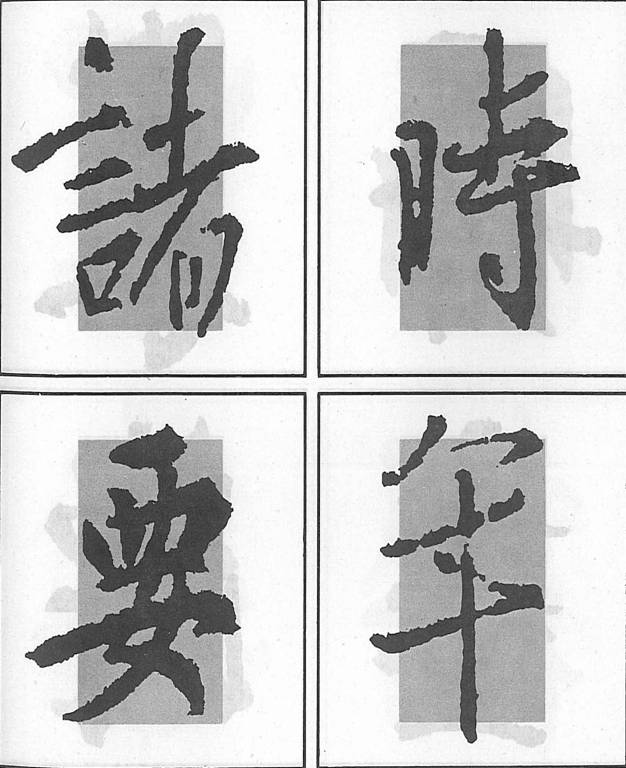
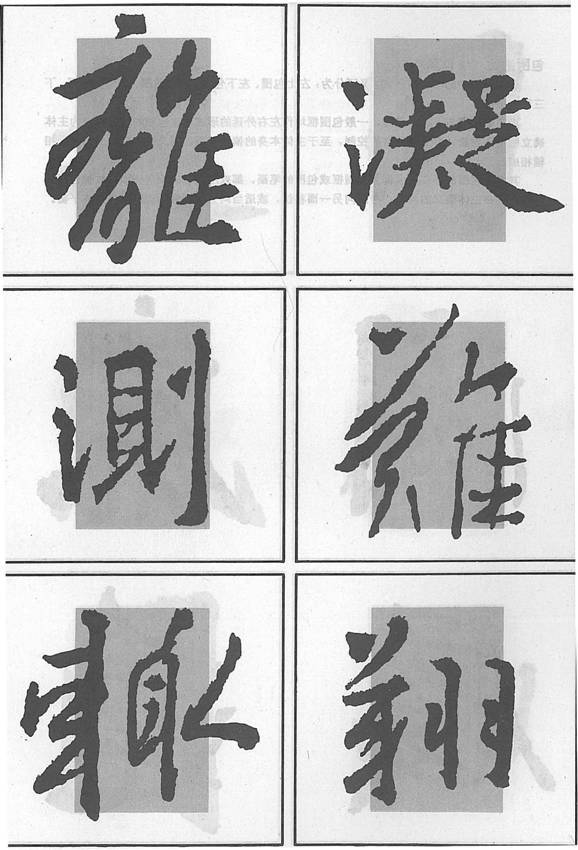
More on Verticals
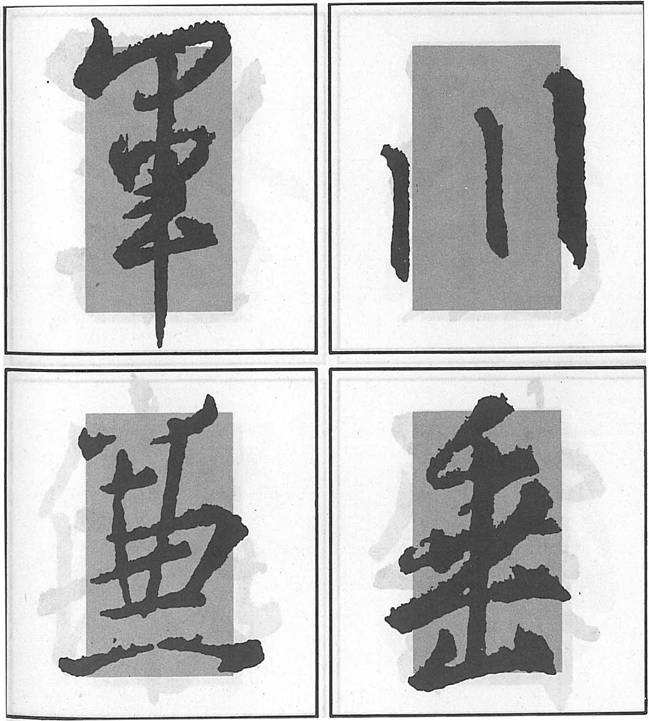 A vertical is a pillar that props up the structure. Aside from a hanging needle and a pendent dew, there are also curving vertical, drooping vertical and a vertical with a hook and etc.
Attention should be paid to height, weight and density when three verticals are together; Watch that the four verticals in “無” become dots and a left stretching stroke, and this is a way of variation.
More on Hooks
In free hand, hook has most variations. They serve as connection, extension and correspond with other strokes.
More on Left Stretching Strokes
Left stretching strokes are like hands and foot. There are longer ones and shorter ones. Longer ones are more often used. Attention should be paid to different finishes.
They also are like hands and foot, and as wings of a bird as well. They have more variations in free hand. When they appear together with left stretching strokes, attention should be paid to their length and weight.
More on Elbows
To write them well, the key lies in where they bend, the bending part can be with less weight but round; 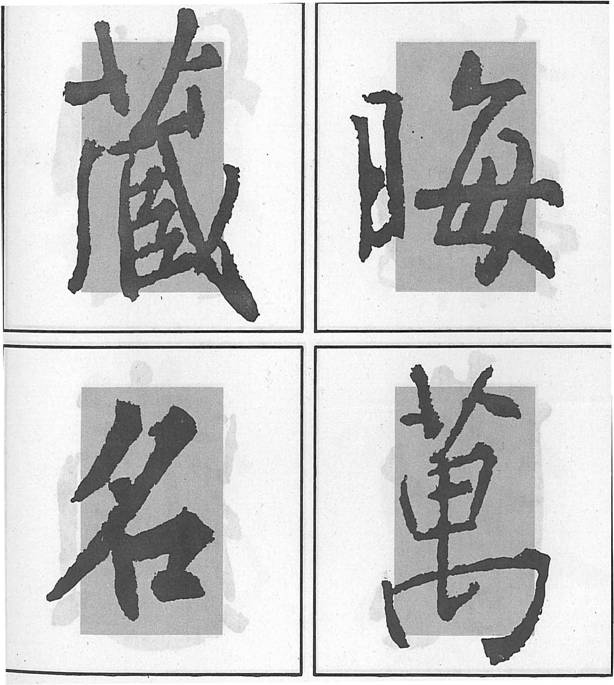 more weight but square; when the bend is round, it should not be too unrestrained; when it is a square, it should not look stasis.
More on a Raise
A raise may vary in length, position, weight and direction. It often finishes off quickly with less weight and corresponds with the next stroke.
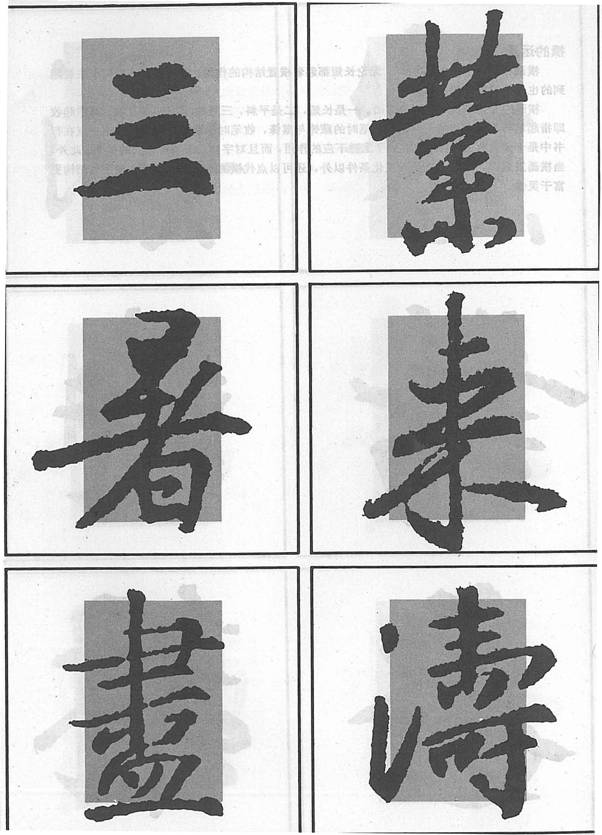
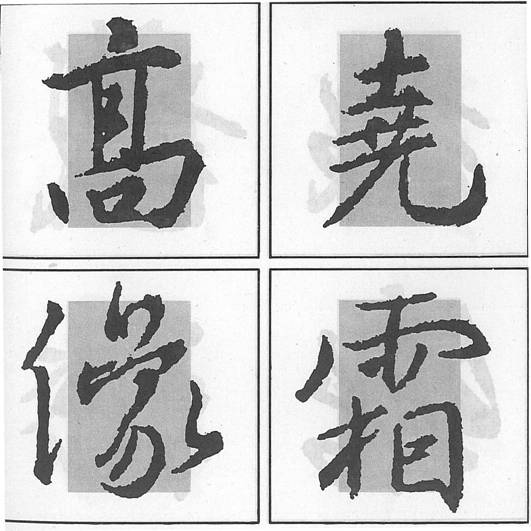
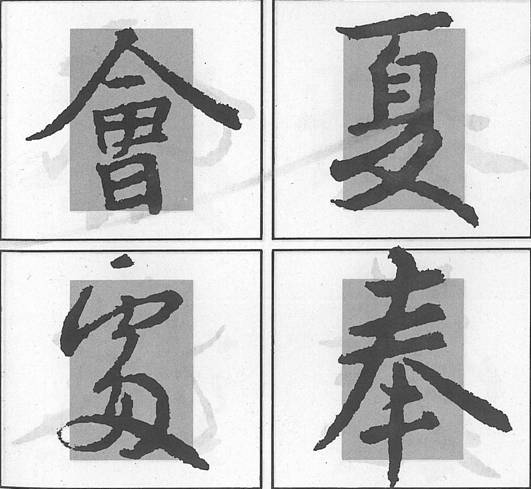
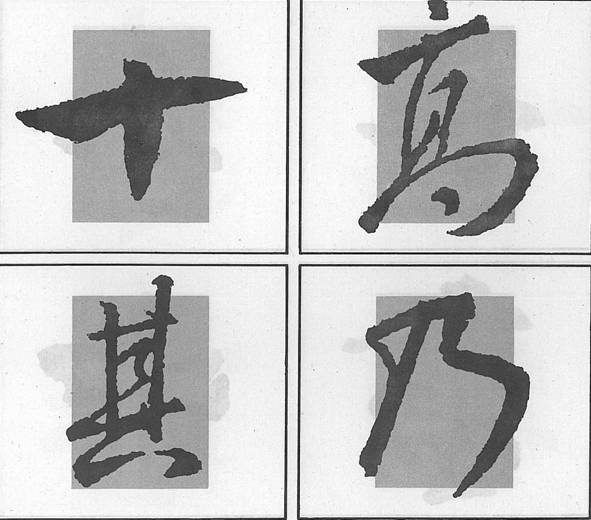
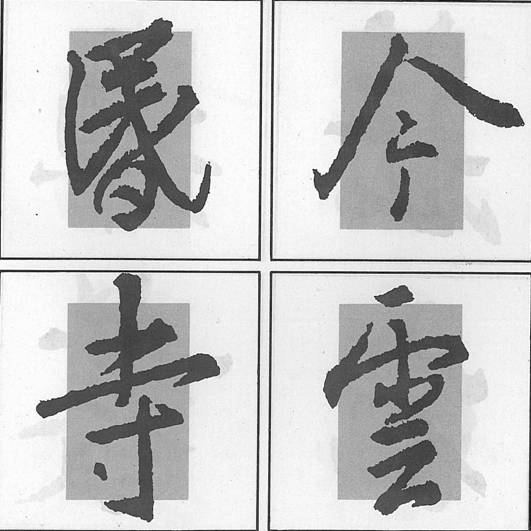
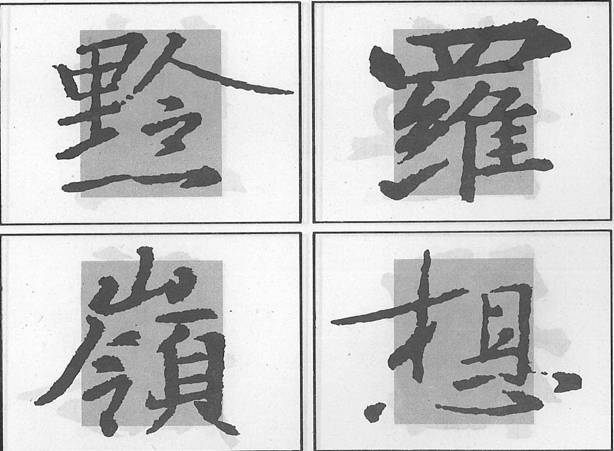
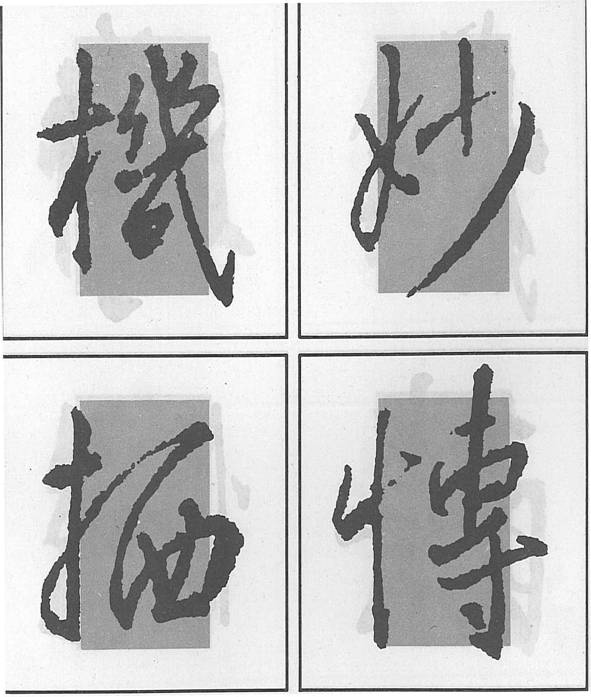
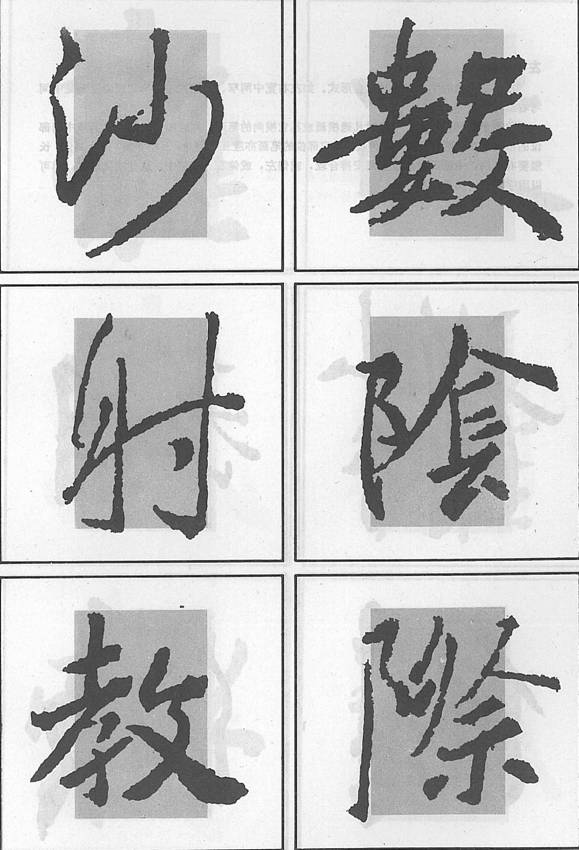
Stand Alone Structure
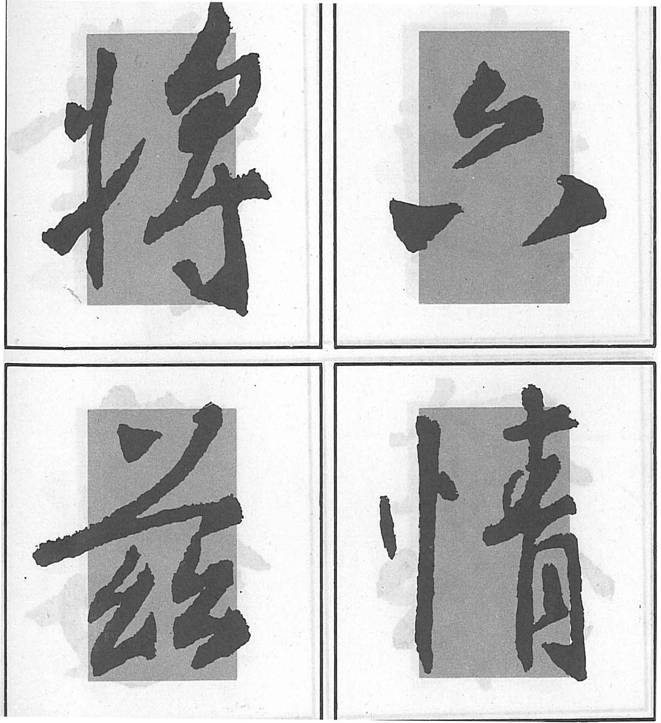
Most strokes are in the inner box, with longer horizontals, left and right stretching strokes going out of the inner box. We should note that the center of gravity is not necessarily be placed in the center.
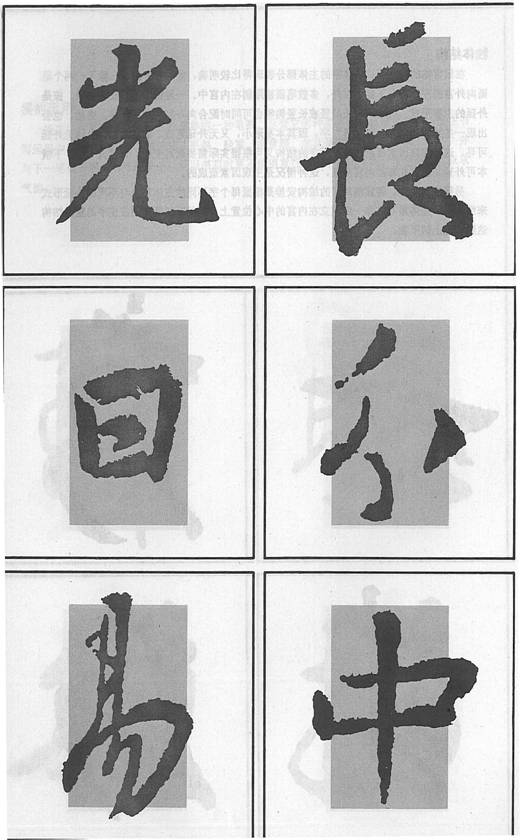
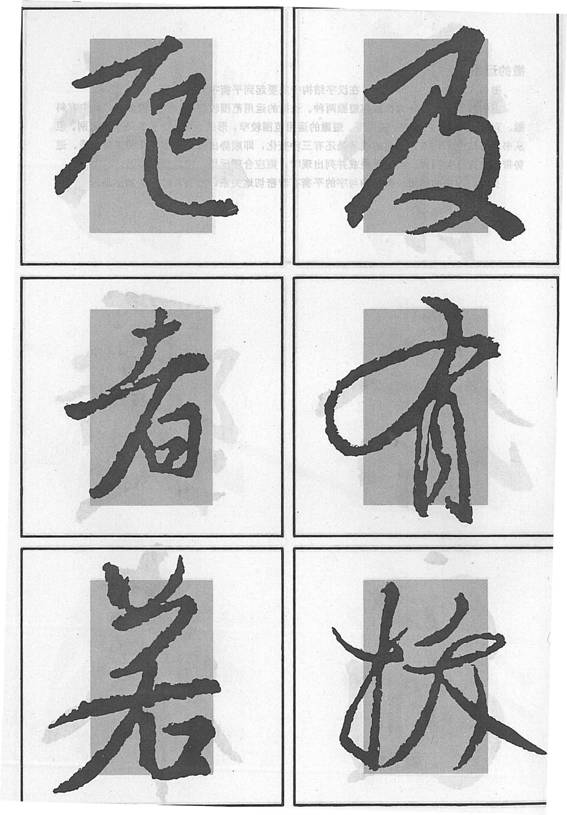
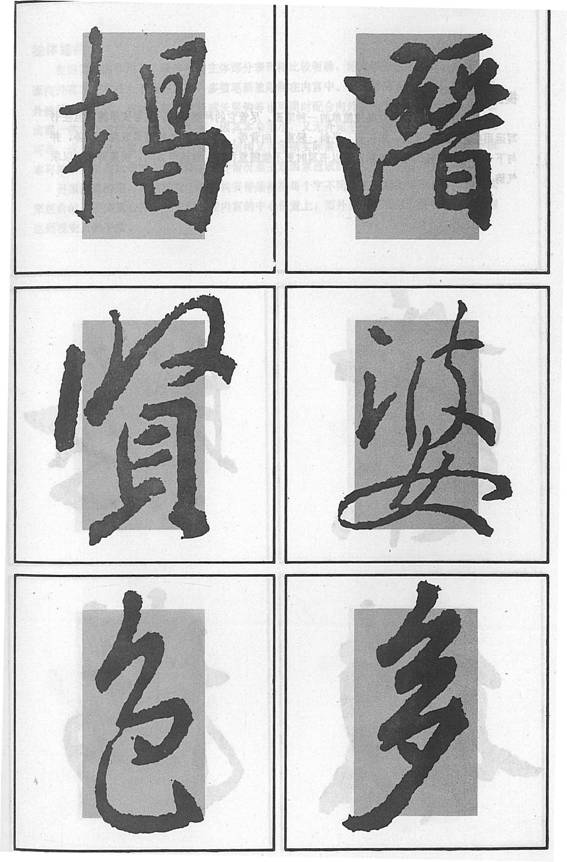
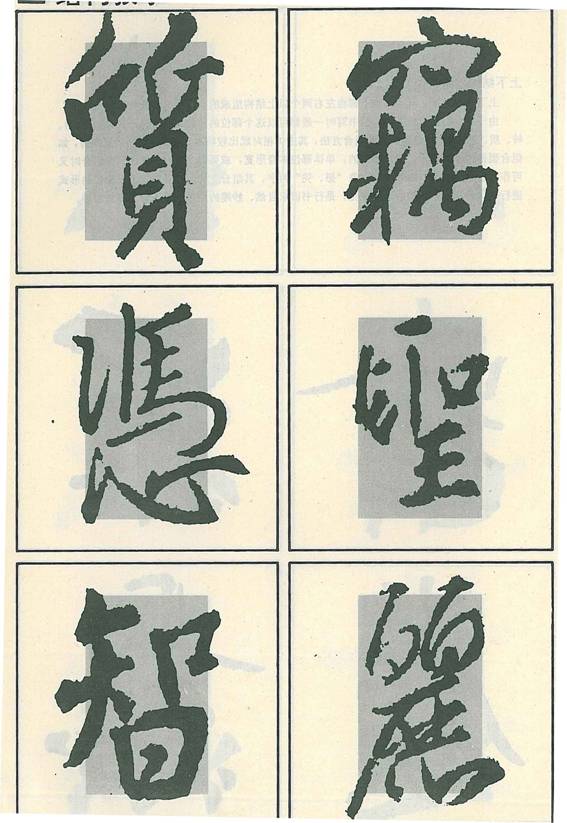
(Wider) Upper and (Narrower) Lower Structure
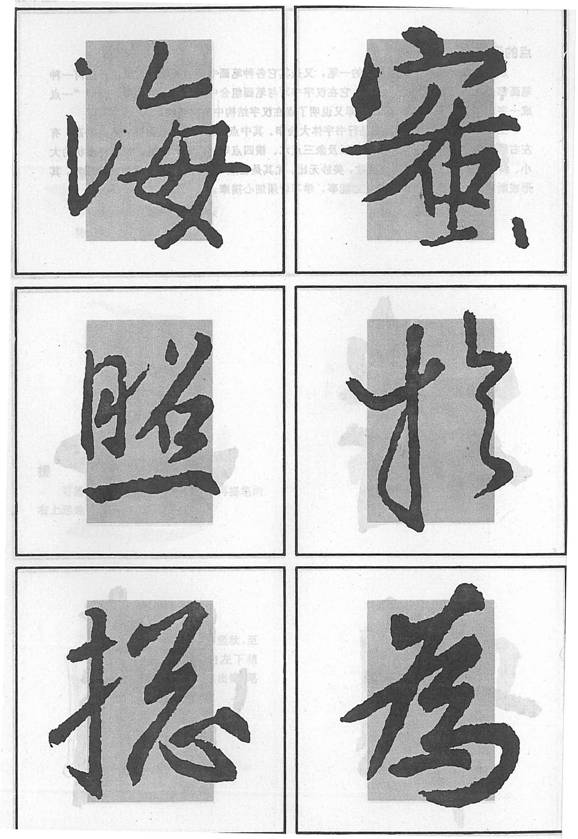
In such a structure, the lower part is the base, which, or most strokes of it is kept within the inner box; the strokes in the upper part can be extended out of the inner box. If the extended part is on the left, the main body should be placed more to the right and vice versa.
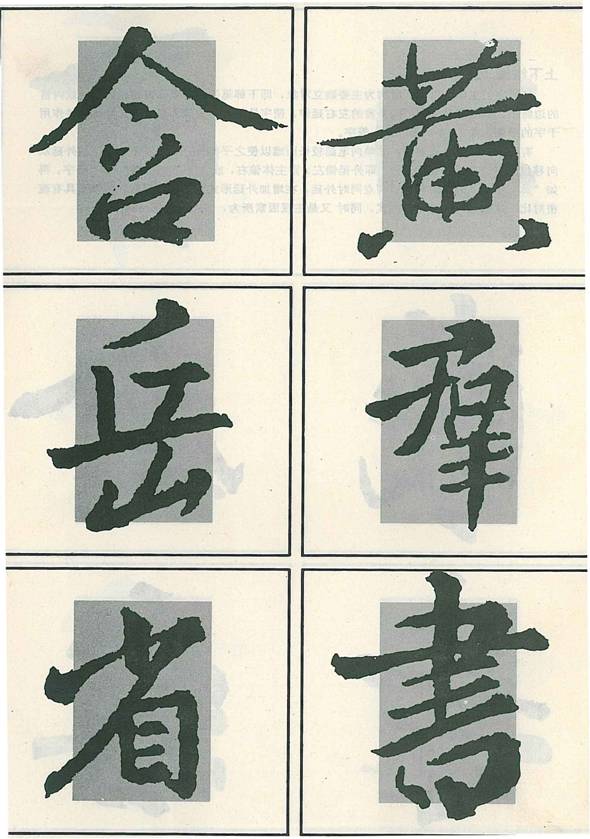
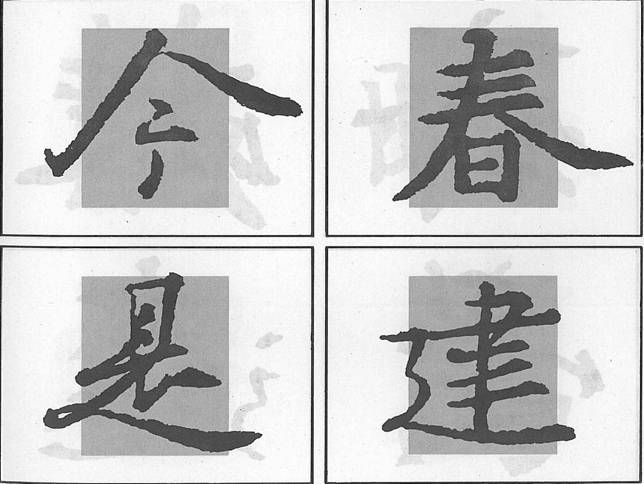
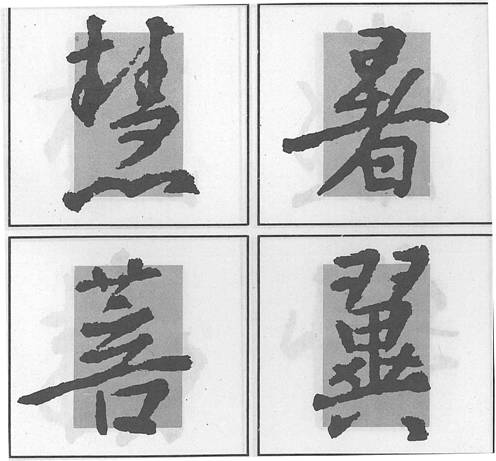
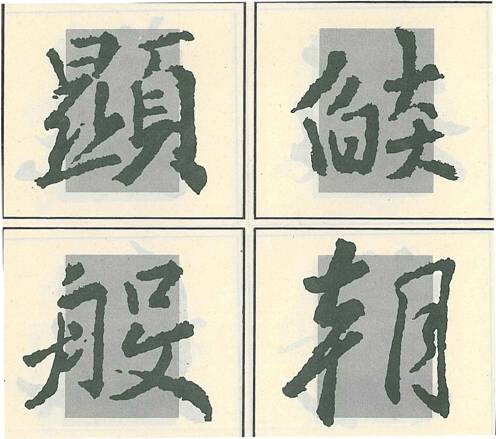
In such a structure, the upper part has to be set properly first, most of its strokes should be kept in the inner box; strokes of the lower part can be extended out. The upper part is usually tight with shorter strokes and the lower part is looser with longer strokes.
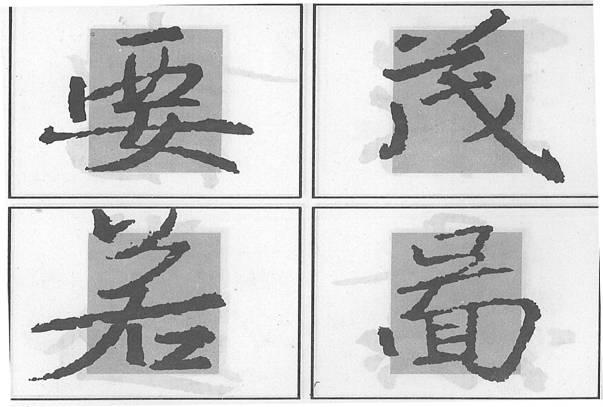
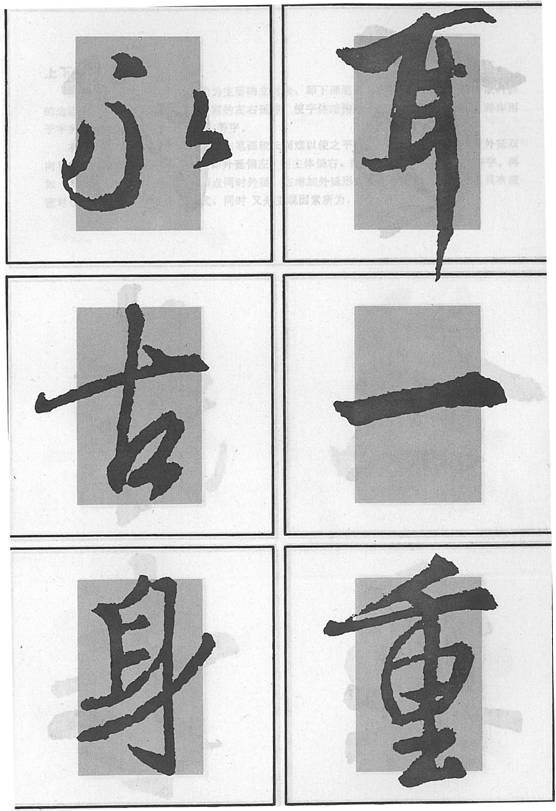
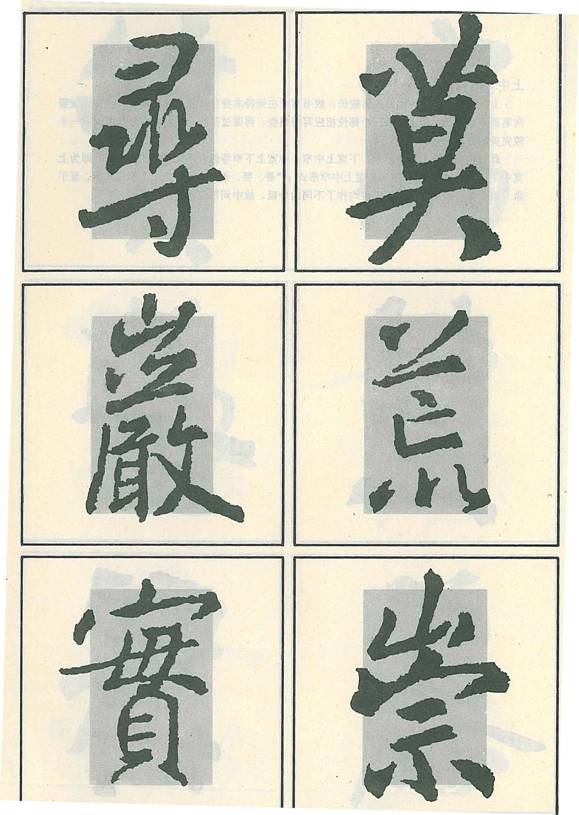
Upper and Lower Structure (Composite Type)
In this kind of structure, the upper or lower part is composed of more than two parts, the composite part usually extends out of the inner box. The placing of parts should be natural and balanced.
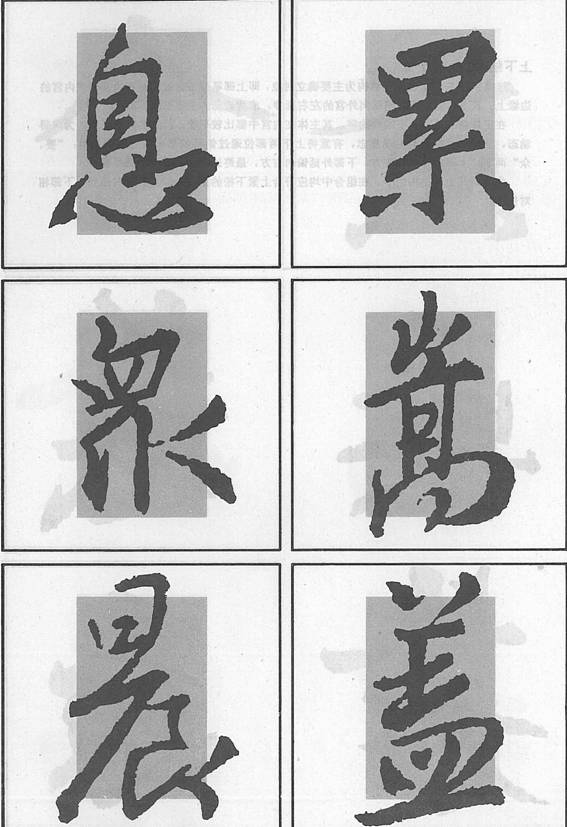
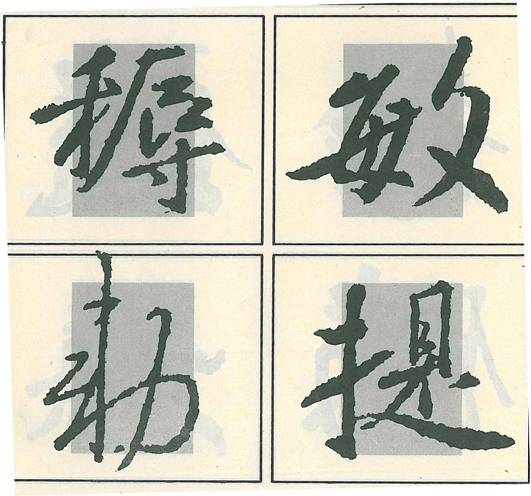
Upper, Middle and Lower Structure
Such a structure is usually longer, so vertical strokes should be contained. There are three main forms, they are wider upper with narrow middle and lower parts; wider lower with narrow middle and upper parts and wider middle with narrow upper and lower parts.
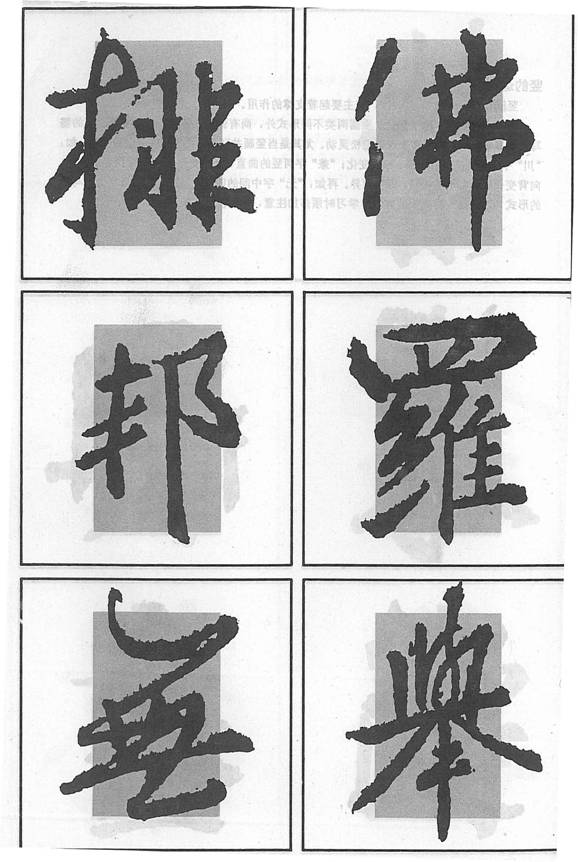
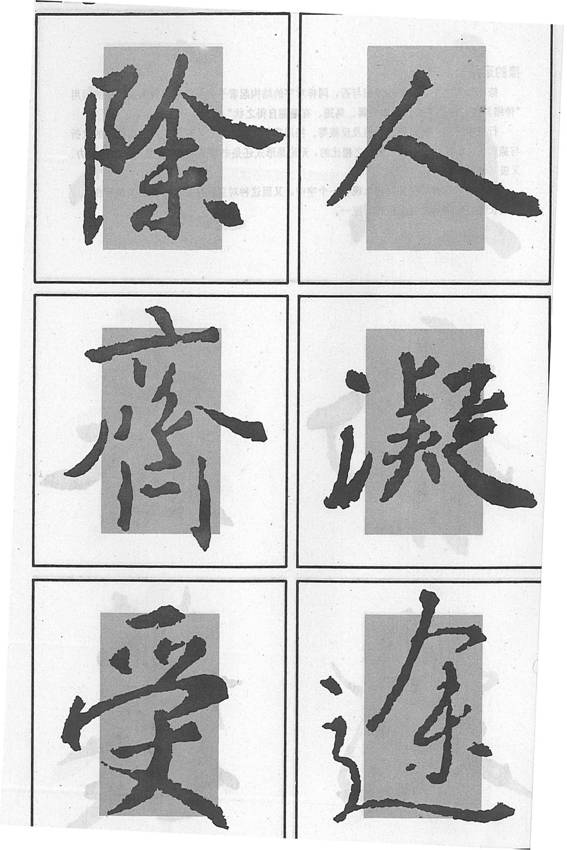
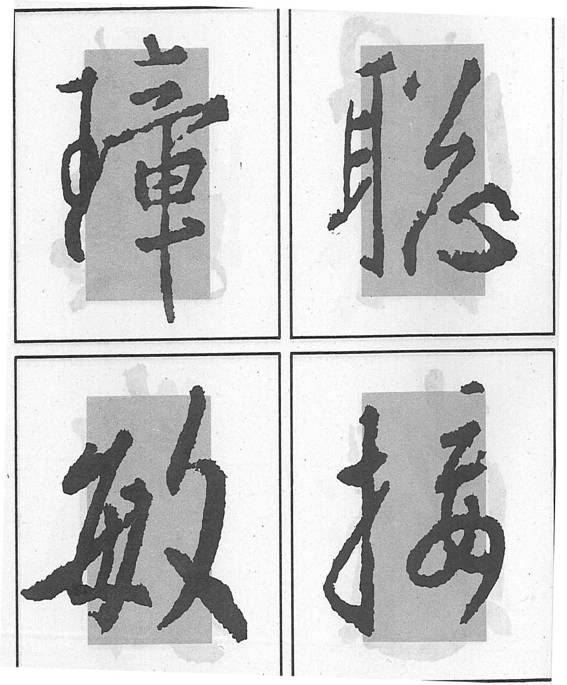
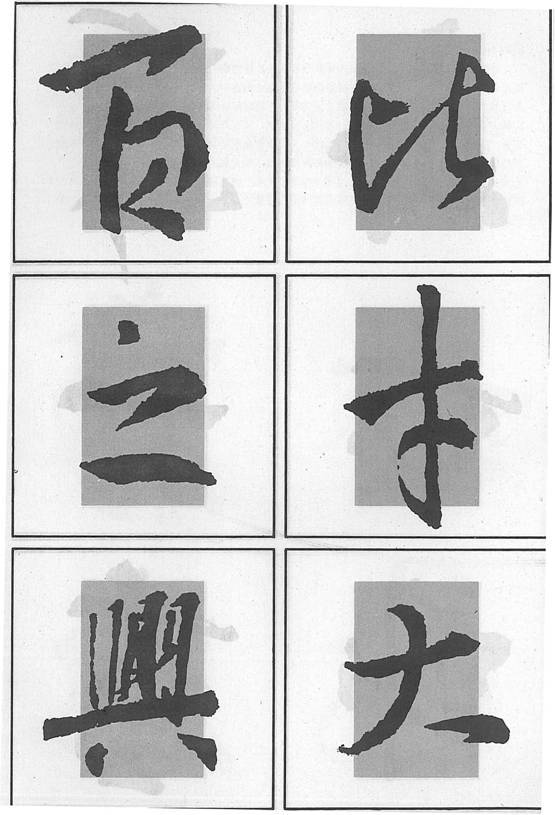
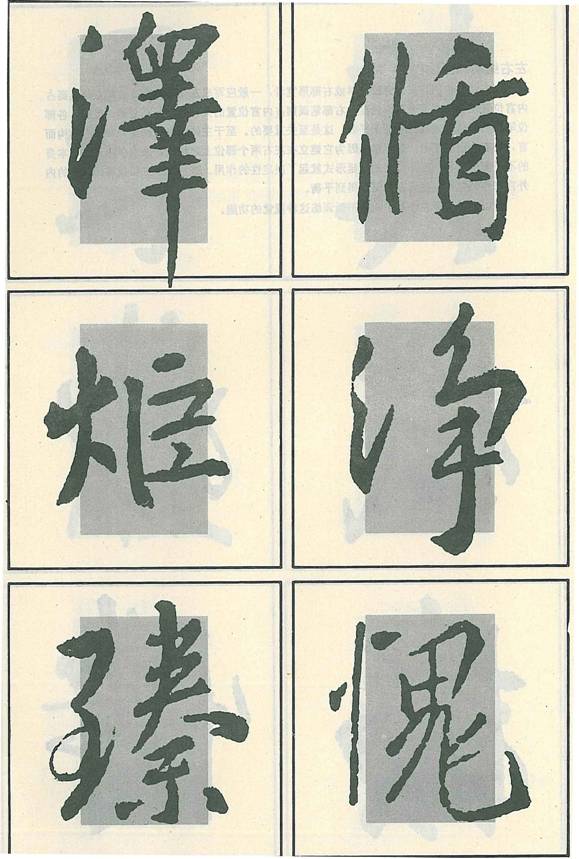
Left (Gives Way to) Right Structure
 The left gives way to the right when the left radical is simpler and the right part is stouter. That is to say the left part takes no or little space in the inner box; while the right part takes up all or most space in the inner box. However, the strokes extended out should balance the entire character.
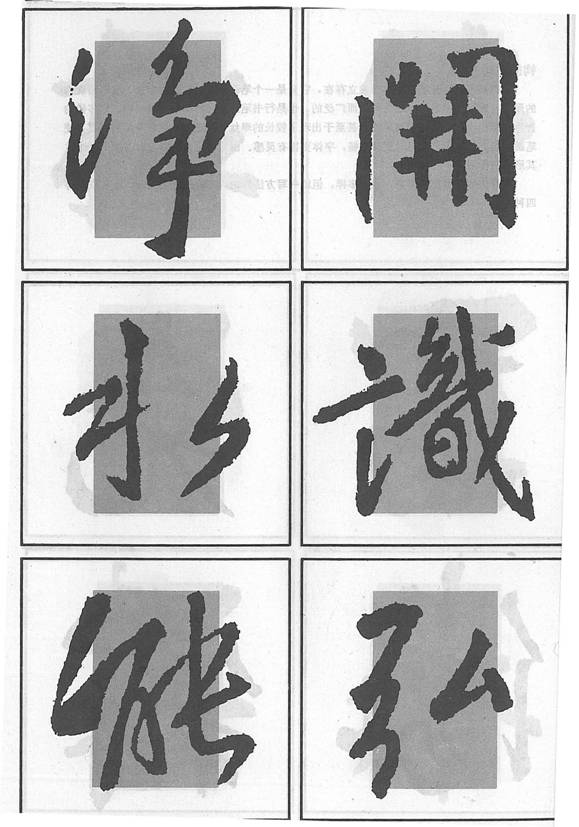
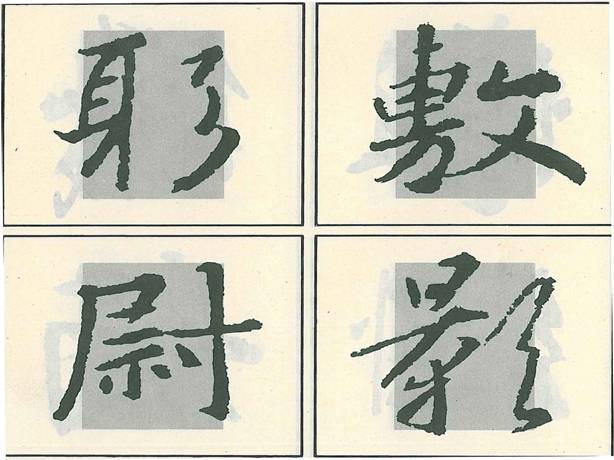
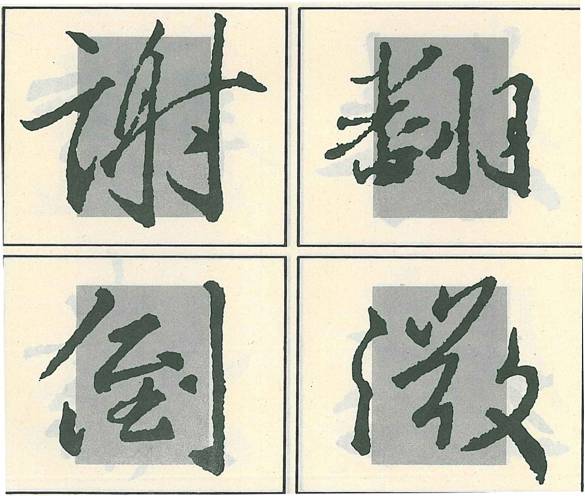
Right (Gives Way to) Left Structure
In such a structure the right part is simpler and the left part is stouter, so the right radical takes no or little space in the inner box while the left part takes up most or all space in the inner box. In some cases the middle part of the inner box should be left open as in 躬、形、影and 引.
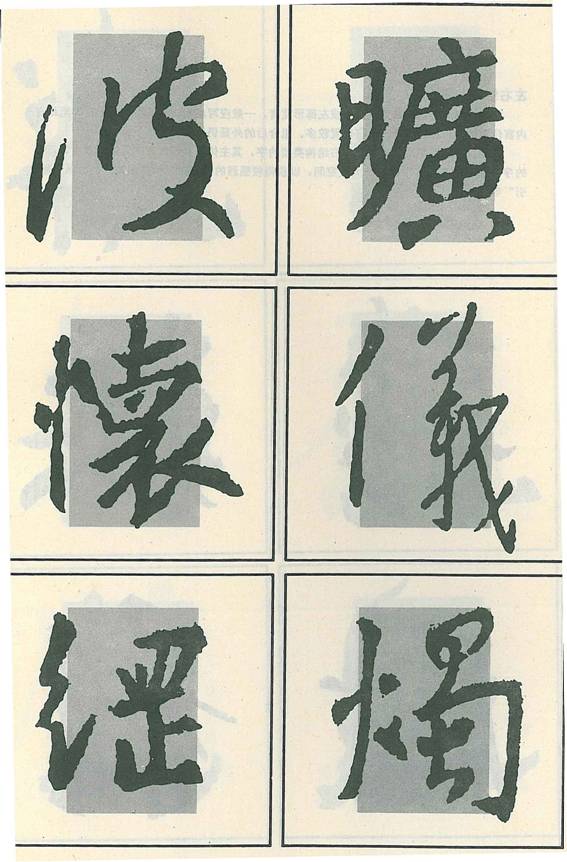
(Equal) Left & Right Structure
In such a structure the two parts are of the same size and take up same space. When we day each takes up half of the space, we refer to the left and right width. The left part can be longer or higher and vice versa.

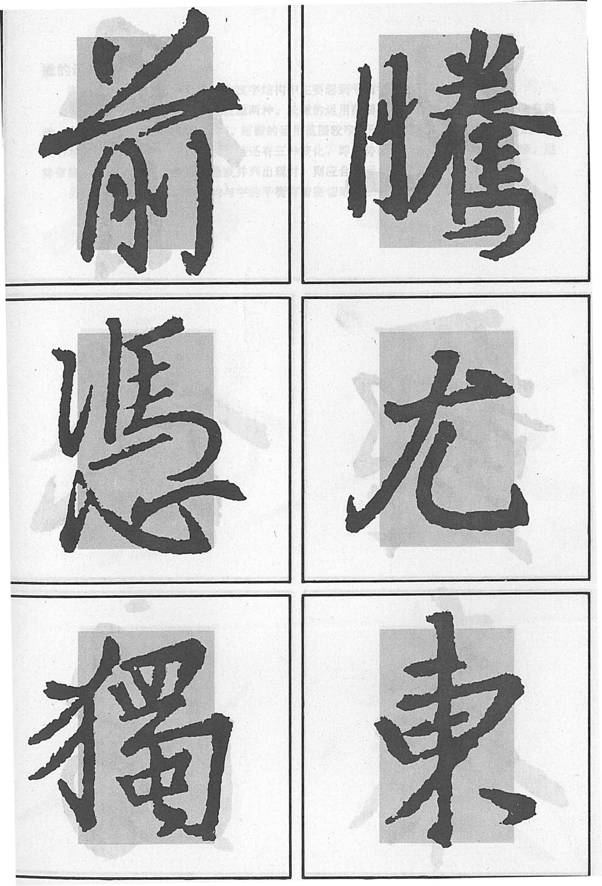
Mutual Inserting Left & Right Structure
In such a structure, strokes of each part intrudes into the other part, the strokes in the inner box are dense, the out extending strokes should balance the main body.
Left, Middle & Right Structure
In such a structure, the left and right parts may be wider with the middle narrower; the middle maybe wider the other two parts narrower; or the left is wider and the other two narrower. Horizontal strokes should be restrained.
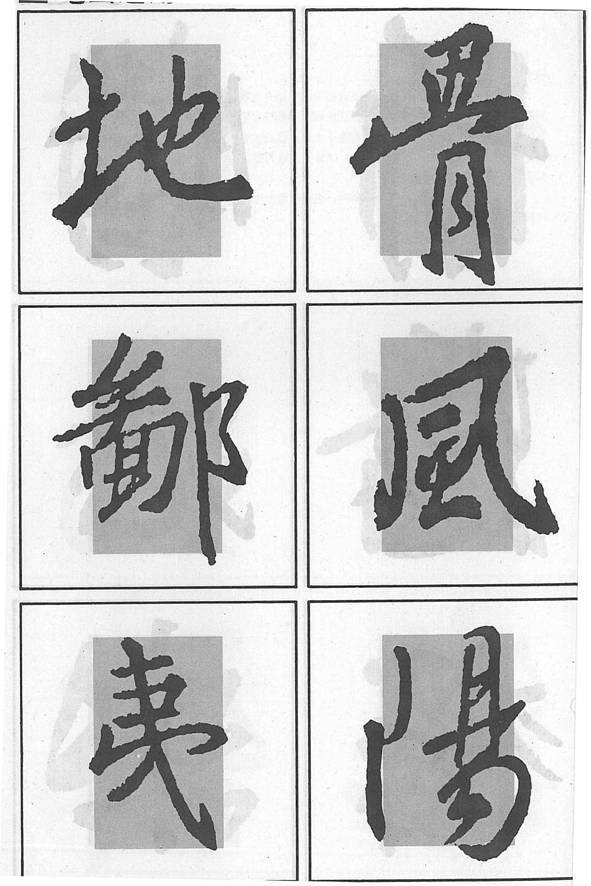
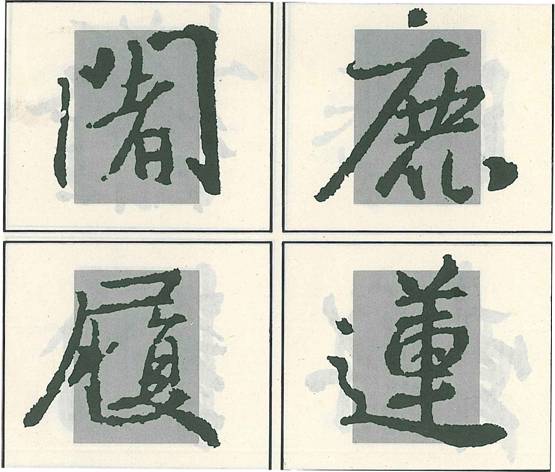
Semi-Enclosure
The enclosure may be upper left, lower left, upper right, upper three sides or lower three sides. The three sides are usually outside the inner box. The enclosing strokes are on one side while the part being enclosed should be on the other side.
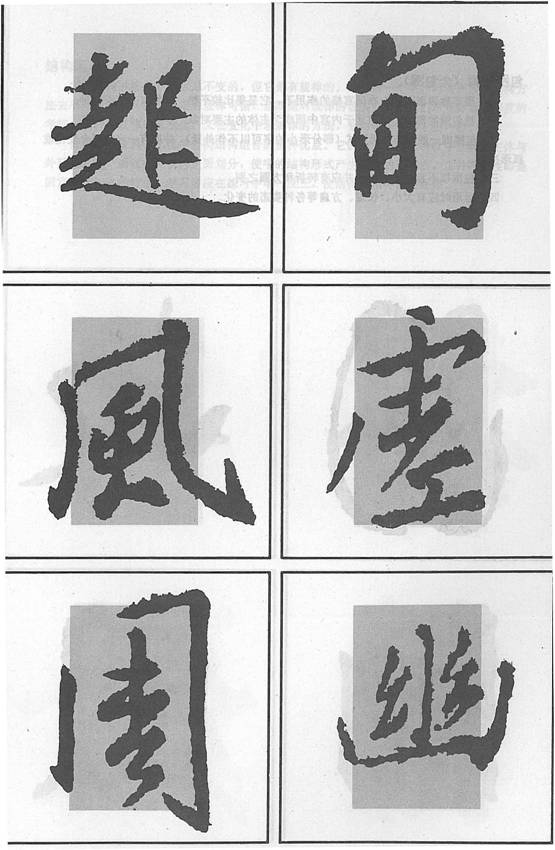
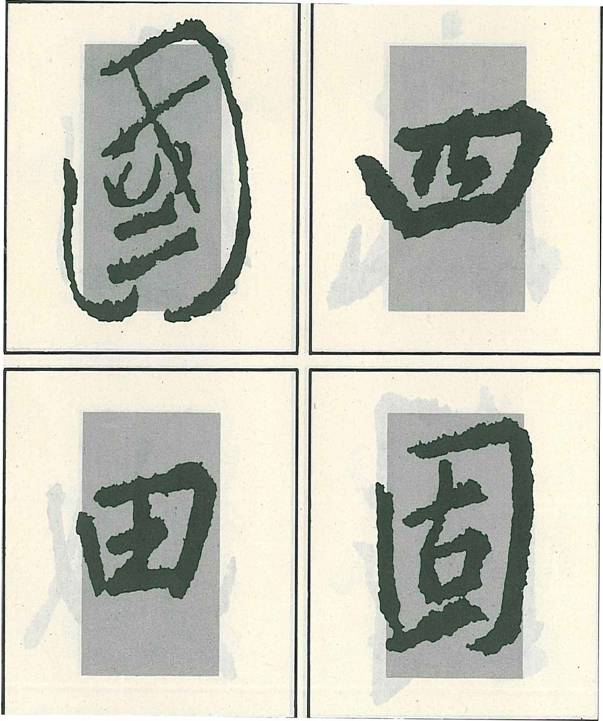
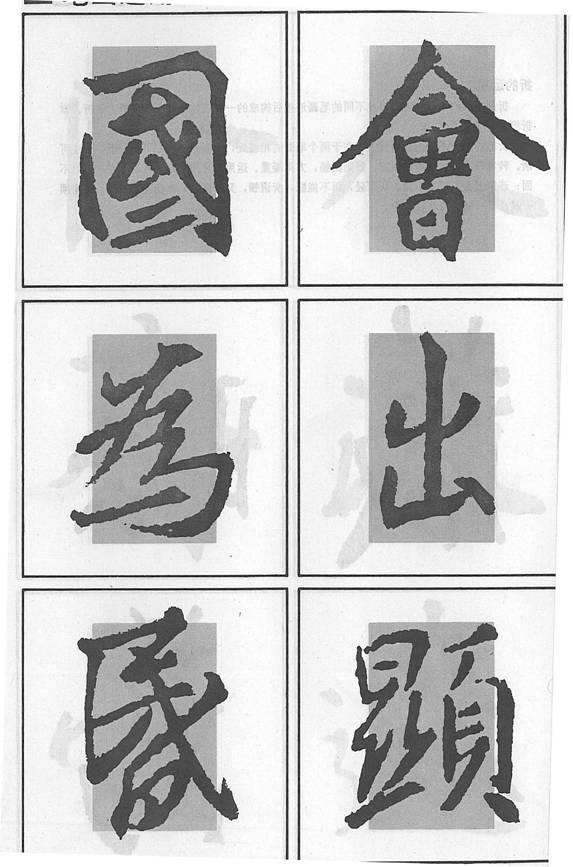
Full Enclosure
Such a structure is very stable. The enclosed part is in the middle; the enclosing strokes are outside the inner box; the enclosing strokes should not be entirely sealed up; there should be variations of size and length and etc. of the enclosure.